
Quantity Break
A quantity break gives a bigger percentage off each unit as the shopper buys more of the items you choose. It is the short form of a volume ladder: a few rows of “buy this many, get this much off”, and an optional table on your product pages that shows shoppers the ladder.
-
Open Discounts and click Create discount, then choose Quantity Break.
Quantity Break sits under Product page offers, with the example “Buy 2, get 10% off each”.
-
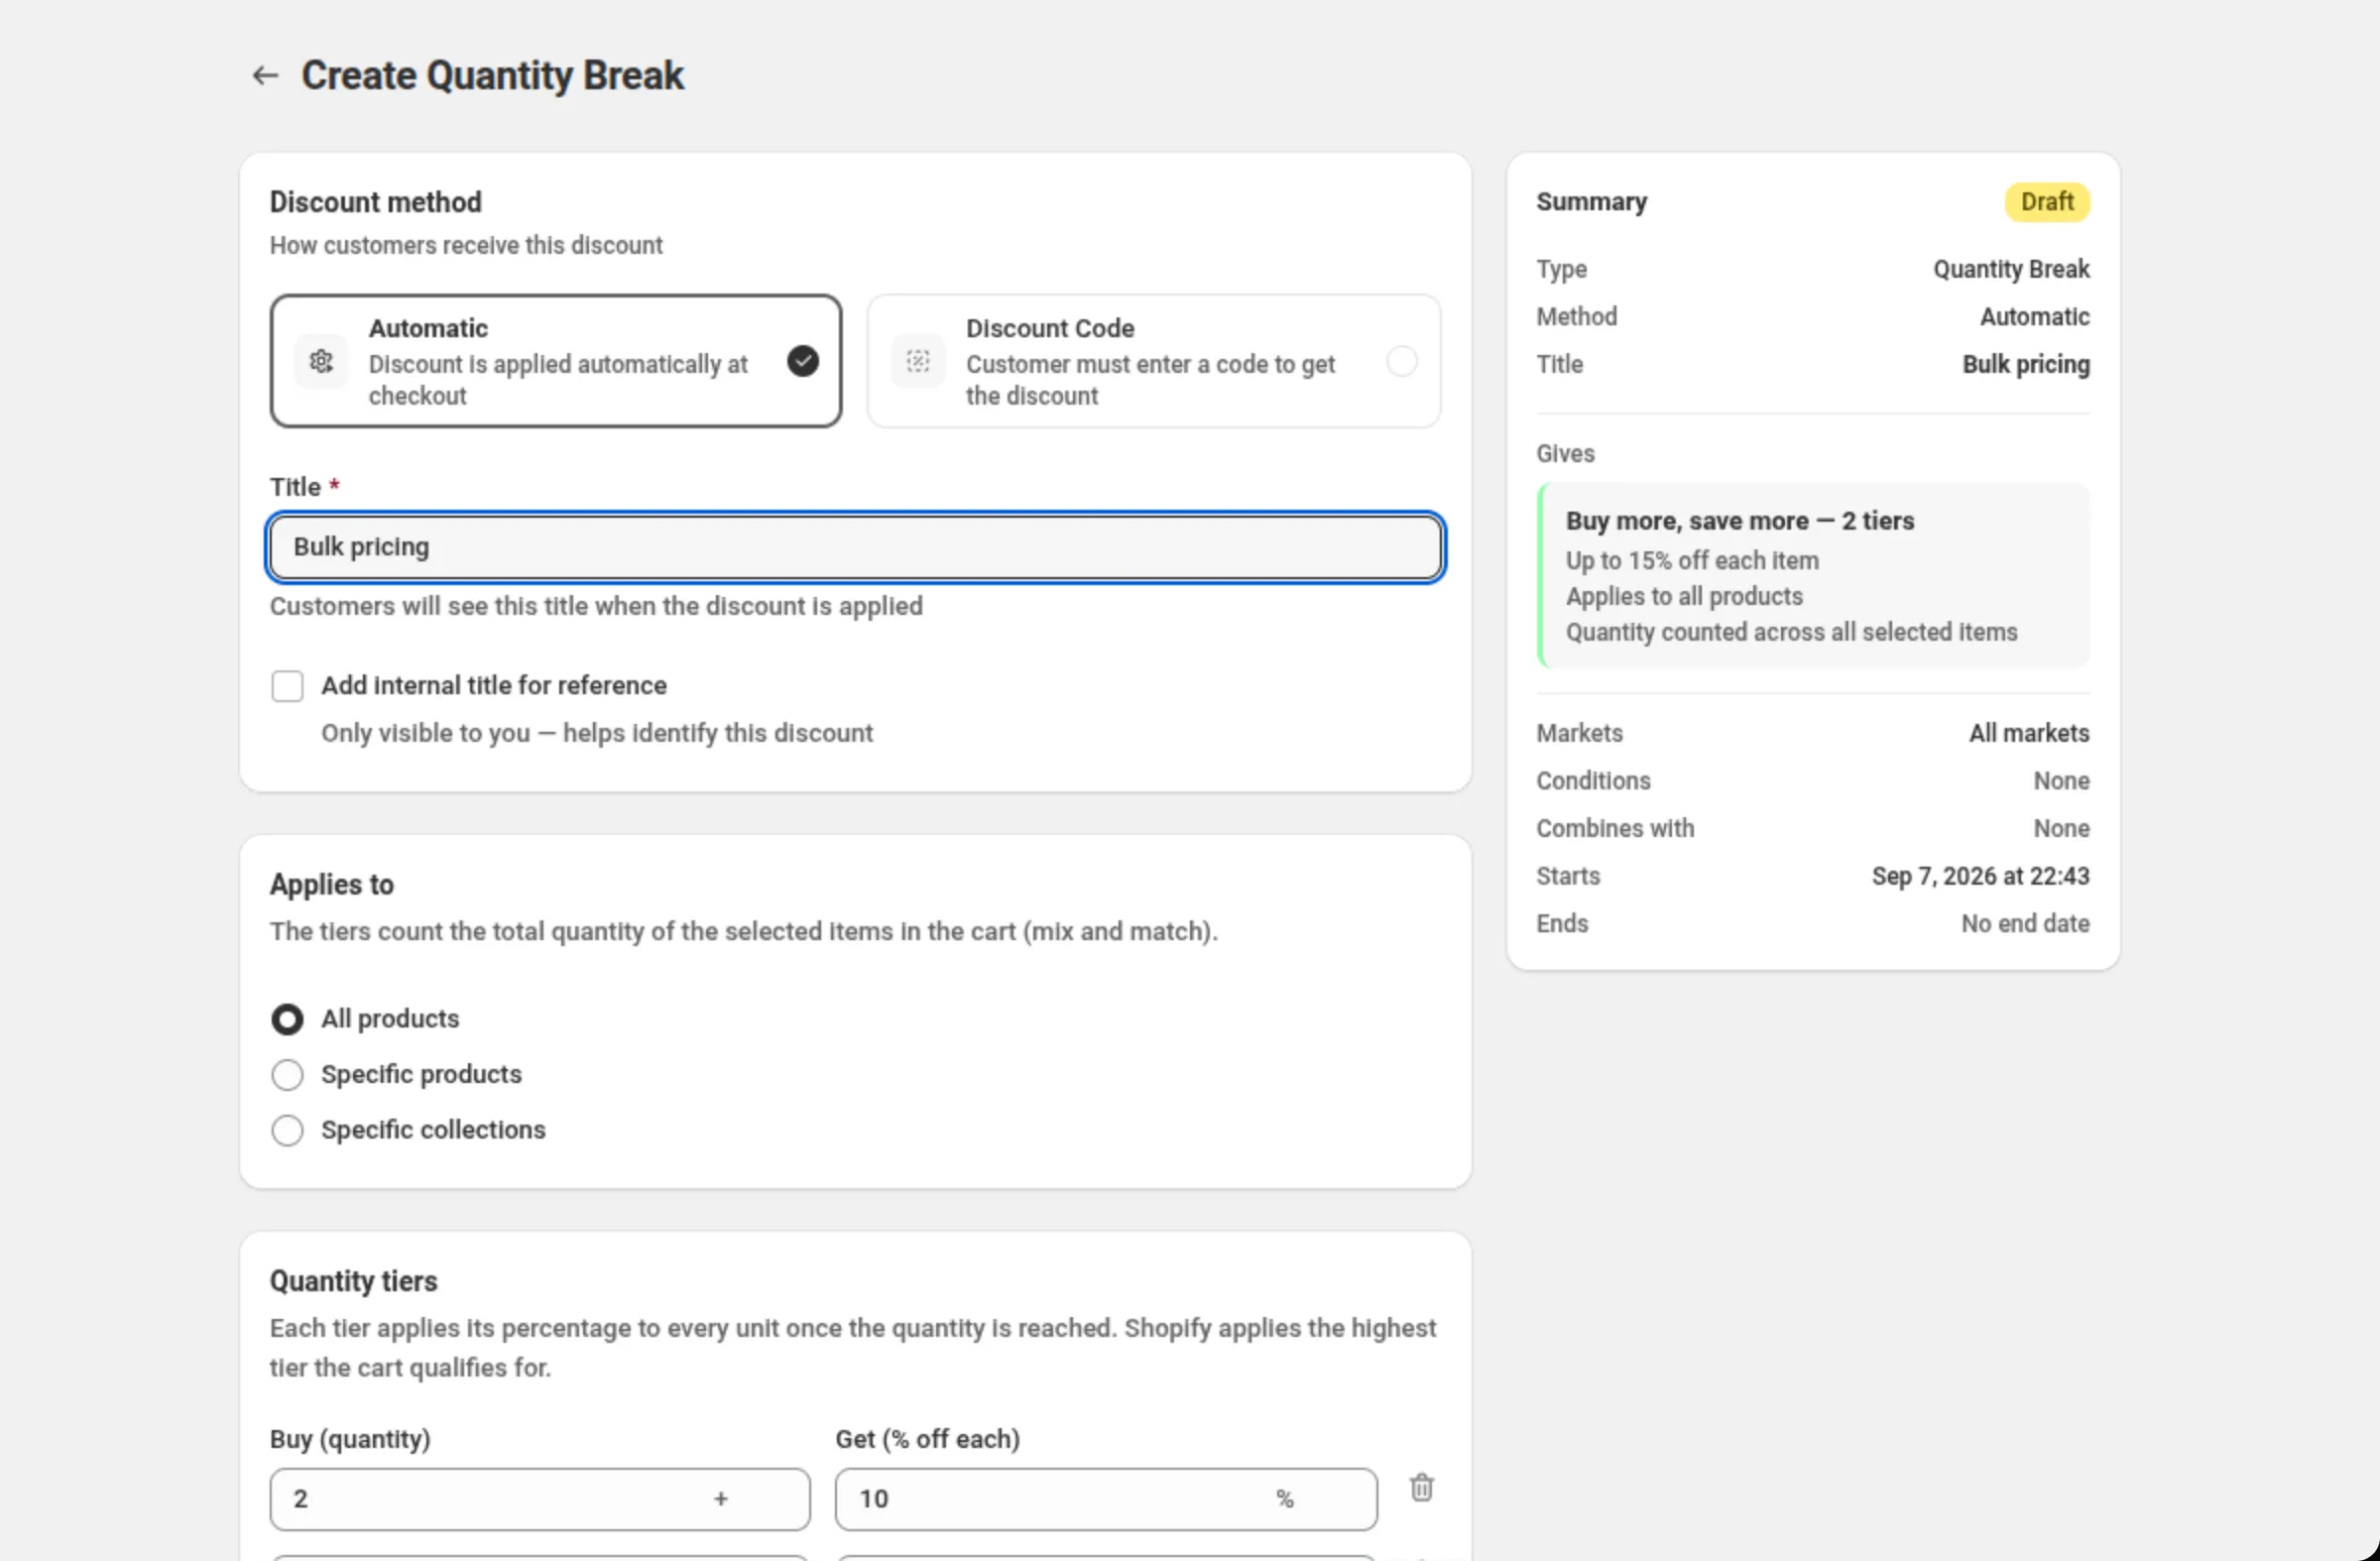
Choose the discount method and name the discount.
Pick Automatic or Discount Code, then fill in Title (automatic) or Discount Code (code).
-
Choose which items the offer applies to.
In Applies to, pick All products, Specific products or Specific collections. The tiers count the total quantity of the selected items in the cart, so two different selected products can add up to the same tier.
-
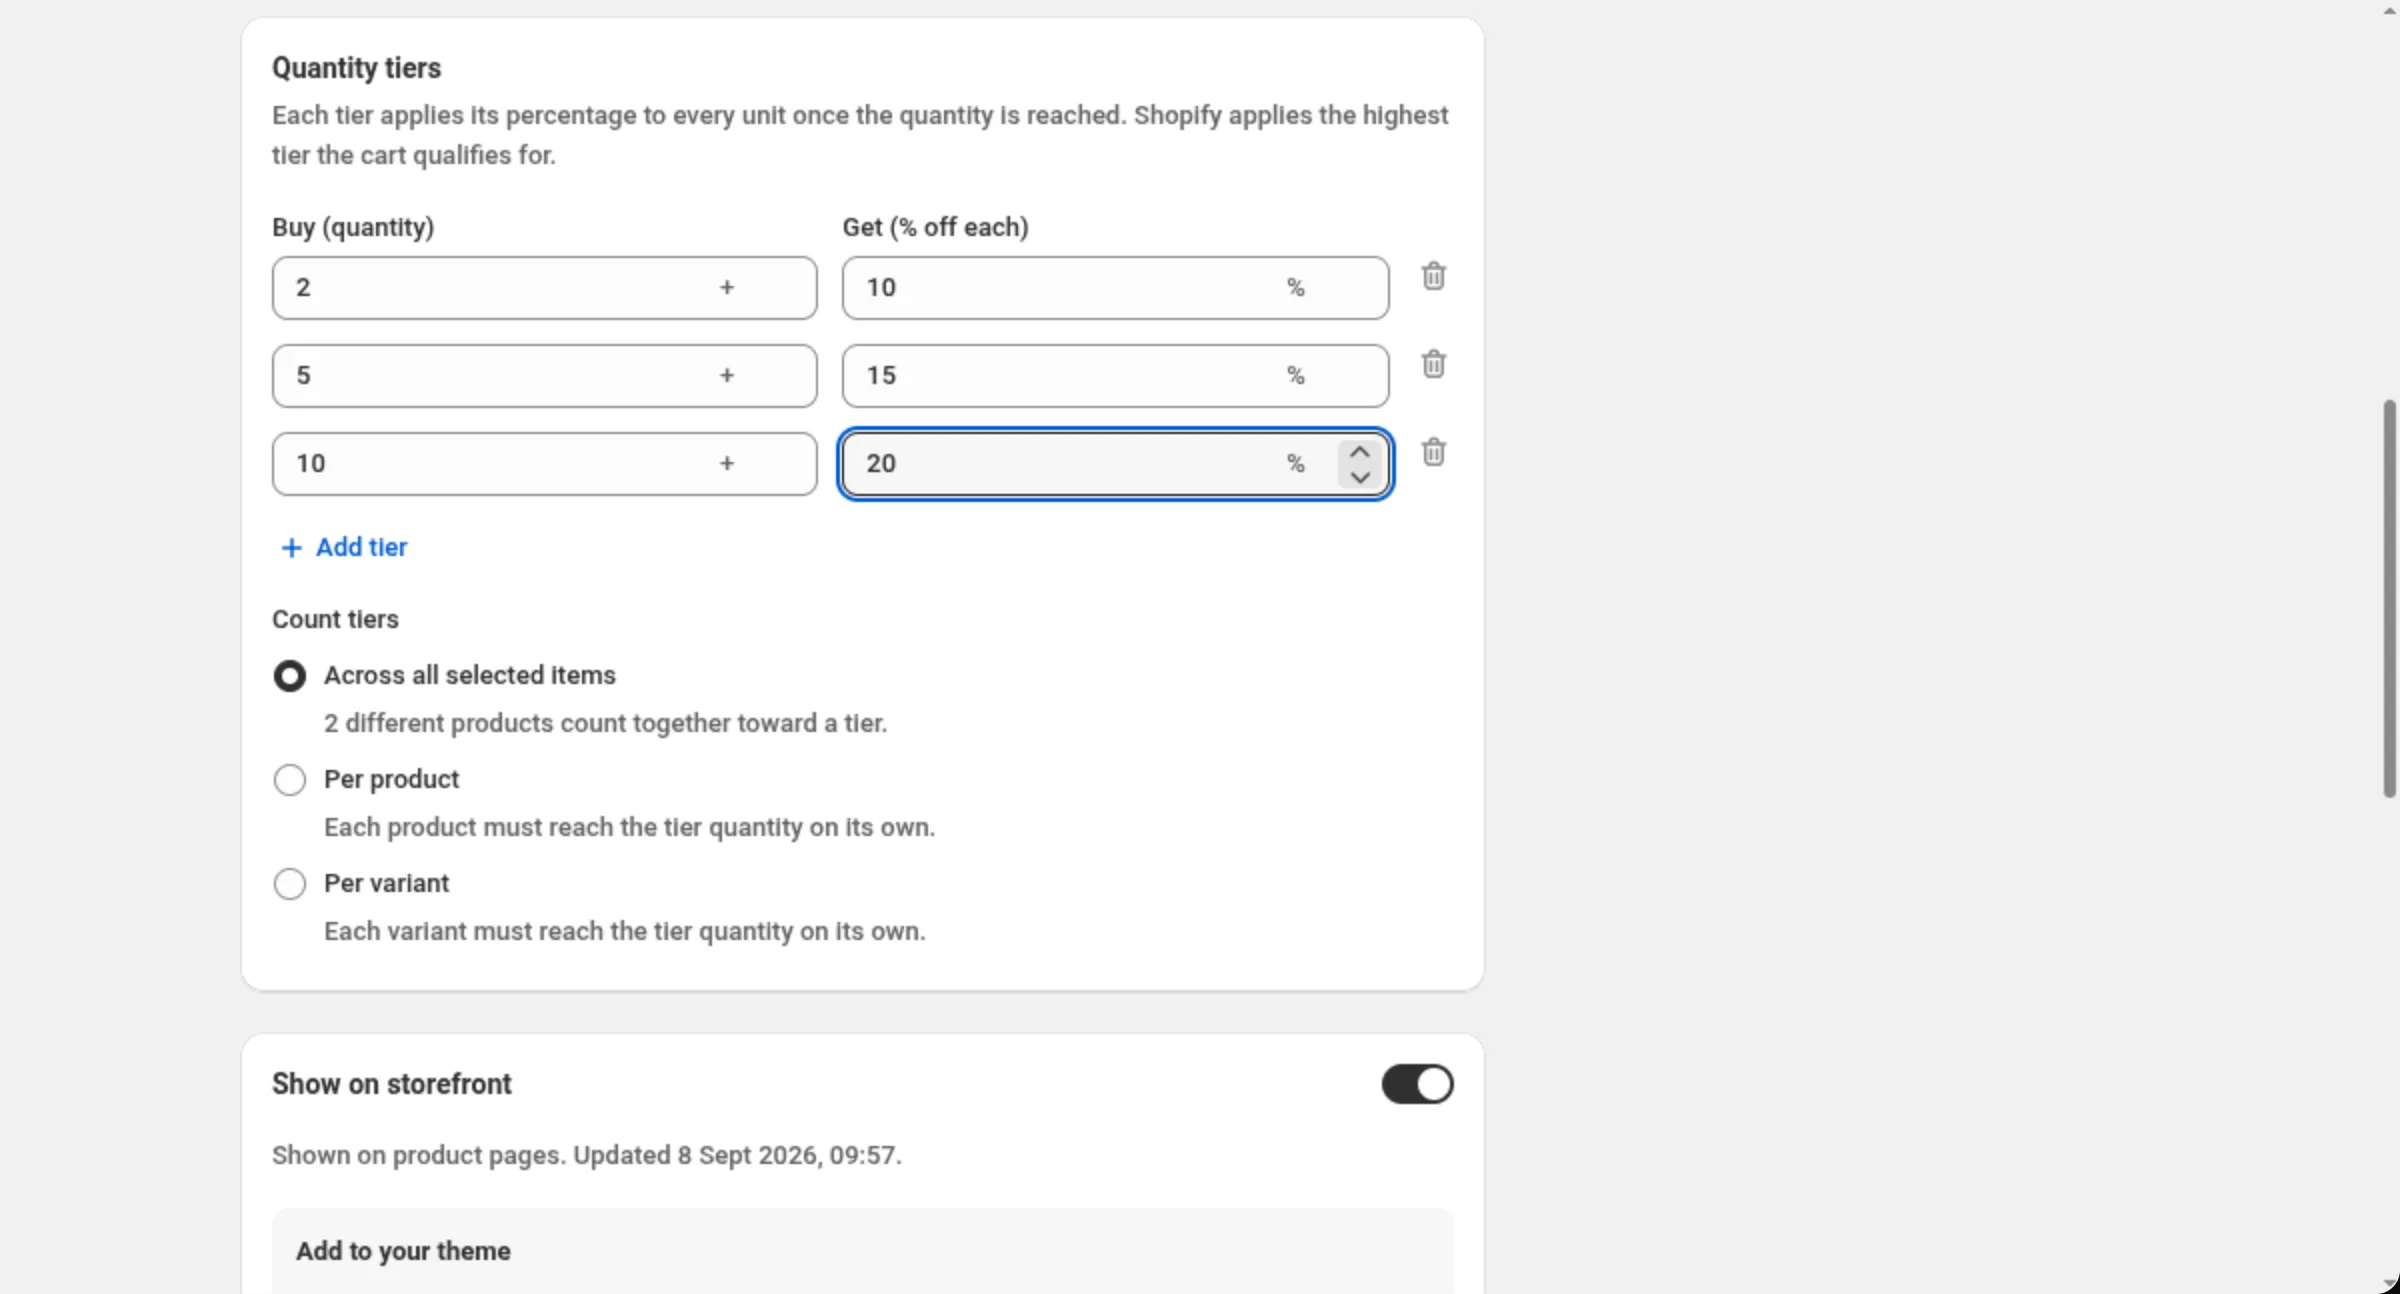
Set the quantity tiers and how they are counted.
A new quantity break starts with two rows — buy 2 for 10% off, buy 3 for 15% off. Edit Buy (quantity) and Get (% off each) on each row, use Add tier for another rung, and set Count tiers to say whether the quantities pool across the selected items or each product or variant must reach the tier on its own.
-
Choose whether the tiers show on your product pages, and add the block.
Show on storefront is on for a new quantity break, and the card tells you what shoppers will see or why nothing can be shown. The switch on its own puts nothing on the storefront: use the Add to your theme panel on the same card to place the Quantity Break Table or the Quantity Break Picker block in your theme.
-
Set combinations, markets and dates, then save.
Choose which other discounts this one may combine with, which markets it runs in, and when it starts and ends. Save from the bar at the top of the page.
Settings
Section titled “Settings”Discount method
Section titled “Discount method”Automatic needs no code — Shopify applies the discount as soon as a cart matches. Discount Code means the shopper has to enter the code you set. The method is chosen when you create the discount.
Title / Discount Code
Section titled “Title / Discount Code”On an automatic discount, Title is the name shoppers see when the discount is applied. On a code discount the field becomes Discount Code.
Add internal title for reference
Section titled “Add internal title for reference”Adds a second name only you see, to tell similar discounts apart in your own list.
Applies to
Section titled “Applies to”All products, Specific products (up to 100) or Specific collections (up to 20). The tiers count the total quantity of the selected items in the cart — mix and match.
Buy (quantity)
Section titled “Buy (quantity)”The number of units that unlocks the tier. A whole number, 1 or more, and each row must be higher than the row above it.
Get (% off each)
Section titled “Get (% off each)”The percentage taken off every qualifying unit once the tier is reached. Greater than 0 and at most 100, and each row must be higher than the row above it. The server rounds it to 2 decimals.
Add tier
Section titled “Add tier”Adds another rung, up to 10 tiers. The new row is pre-filled one higher than the row above as a suggestion; you can change it.
Count tiers
Section titled “Count tiers”Across all selected items pools the quantities, so two different products count together towards a tier. Per product and Per variant make each product or variant reach the tier quantity on its own. Both per-bucket modes carry a note about how the storefront table behaves.
Show on storefront
Section titled “Show on storefront”On for a new quantity break. It makes this offer available to the storefront blocks on the product pages the offer covers. The blocks themselves are added from the Add to your theme panel on the same card — Quantity Break Table, which lists every tier on the product page, and Quantity Break Picker, tappable deal cards shoppers add to cart. Until one of them is in your theme, nothing shows. It is display only either way — turning the switch off hides the blocks and leaves the discount running. To stop the discount, pause the offer instead.
Discount can be combined with:
Section titled “Discount can be combined with:”Ticks for Product discounts, Order discounts and Shipping discounts. Leave them off and this discount runs alone; tick a box and Shopify may apply that kind of discount alongside it.
Maximum discount usage
Section titled “Maximum discount usage”Only shown for a discount code. Limit number of times this discount can be used in total adds a Maximum discount uses field, and Limit to one use per customer caps it per shopper. While either is set, the storefront table is hidden — the discount still applies.
Markets
Section titled “Markets”Apply to all markets covers every current and future market. Apply to specific markets lets you pick up to 20; at least one is required once you switch to it.
Active Dates
Section titled “Active Dates”Start Date and Start Time say when the offer begins, and Set End Date adds an end. All times are in your store’s timezone, which the card names on screen.
Examples
Section titled “Examples”Buy 2, get 10% off — buy 5, get 20% off, on one collection
Discount method: AutomaticTitle: Bulk pricingApplies to: Specific collectionsChoose collections: SocksTier 1 → Buy (quantity): 2 · Get (% off each): 10Tier 2 → Buy (quantity): 5 · Get (% off each): 20Count tiers: Across all selected itemsA ladder on the whole catalogue
Discount method: AutomaticTitle: Buy more, save moreApplies to: All productsTier 1 → Buy (quantity): 3 · Get (% off each): 5Tier 2 → Buy (quantity): 6 · Get (% off each): 10Tier 3 → Buy (quantity): 12 · Get (% off each): 15Each product must reach the quantity on its own
Discount method: AutomaticTitle: Case pricingApplies to: Specific productsChoose products: Espresso beans 1kg, Filter beans 1kgTier 1 → Buy (quantity): 4 · Get (% off each): 10Count tiers: Per productHow it shows to the shopper
Section titled “How it shows to the shopper”An automatic quantity break needs nothing from the shopper: Shopify applies the highest tier the cart qualifies for and takes that percentage off every qualifying unit, in the cart. The Title you typed names the saving. A code quantity break applies once the shopper enters the code.
With Show on storefront on and one of the blocks added to your theme, the ladder also appears on the product pages the offer covers, so shoppers see what buying more is worth before they add anything.
Limits and notes
Section titled “Limits and notes”- Tiers: at least 1, at most 10.
- Buy (quantity): a whole number 1 or more, higher on every row than the row above.
- Get (% off each): greater than 0, at most 100, rounded by the server to 2 decimals, and higher on every row than the row above.
- Specific products: up to 100. Specific collections: up to 20.
- Markets: up to 20 when you pick specific markets.
- Tiers never stack. Shopify applies the highest tier the cart qualifies for.
- Per-variant tiers are not drawn as a table. The table block stays hidden for them; the card says “Per-variant tiers show in the Quantity Break Picker block — the table block doesn’t support them.” The picker block and the discount are unaffected.
- Per-product tiers are drawn without the counting mode, so a shopper mixing products sees the tiers but only qualifies per product.
- Combinations are Shopify’s call. Ticking a box tells Shopify this discount may run alongside that kind; Shopify decides what actually applies.
- The method is fixed after creation. Automatic and Discount Code cannot be swapped on an existing discount; duplicate it instead.
Do the tiers add up? No. Shopify applies the highest tier the cart qualifies for and that tier’s percentage comes off every unit. Tiers replace each other.
Can two different products count towards the same tier? Yes, while Count tiers is Across all selected items — the default. Per product and Per variant make each one reach the tier quantity on its own.
Why is the storefront table not showing for my per-variant tiers? Only the table block hides for per-variant offers, because a static table would read as if the quantities pooled. The Quantity Break Picker block still shows those tiers, and the discount is unaffected either way.
My discount code has a usage limit and the table disappeared. Why? The widget is hidden while usage limits are set. The discount still works — remove the limits if you want the table back.
Related
Section titled “Related”- Price List — the same idea with more control: fixed amounts, a price per item, spend-based tiers and product rules.
- Spend More Save More — tiers measured by the amount spent, taken off the whole order.
- Product discount — one price change on chosen items, with no tiers.